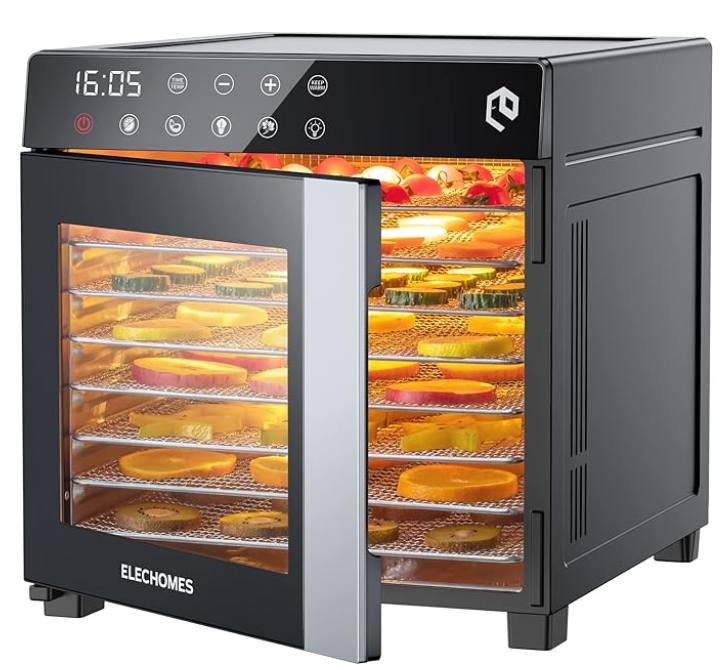
Food Dehydrator Machine, Elechomes Upgraded 8-Tray Dryer with Digital Time & Temperature Control, LED Panel, Overheat Protection, 600W Dryer for Fruit, Beef Jerky, Herbs, Pet Food (50 Recipes)
- It comes with 8 stainless steel food trays. You can dry various fruits, vegetables, meat, flowers, herbs, and other food at once. Easy to clean – food trays are dishwasher safe and the housing can be easily wiped down.

Food Dehydrator, Elechomes Upgraded 6-Tray Dryer for Beef Jerky, Meat, Fruit, Dog Treats, Herbs Vegetable, Digital Time & Temperature Control, Overheat Protection Fruit Roll Sheet Included, BPA Free
- Elechomes food dehydrator machine is perfect for food storage like beef jerky, fruits, vegetables, dry backpacking food for outdoor hikers. Make non-addition fruit rolls for your kids easily with a bonus fruit roll sheet. (Search for UH0401 to get more accessories)
Transform Your Kitchen Adventures with This Versatile Appliance
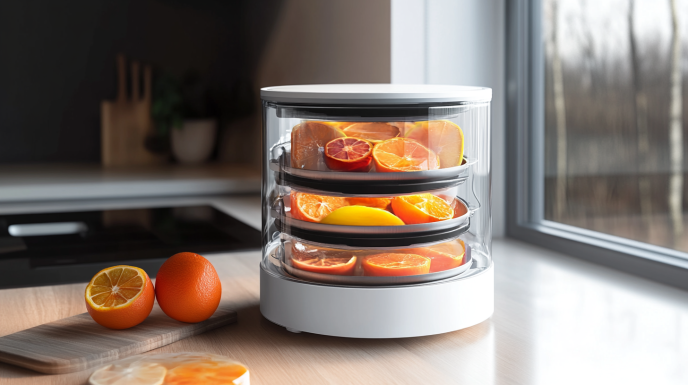
The gentle hum of my Elechomes dehydrator has become a familiar, comforting sound in my kitchen. It’s Tuesday afternoon, and the sweet aroma of cinnamon-dusted apple slices wafts through my home as they slowly transform into crispy, nutrient-dense snacks. I’ve been on this food preservation journey for three years now, and I can confidently say that investing in a quality food dehydrator like the Elechomes model has revolutionized my approach to healthy eating and reducing food waste.
If you’re new to the world of dehydrating or considering upgrading your current setup, you’ve landed in the right place. In this comprehensive guide, I’ll share everything I’ve learned about making the most of this remarkable kitchen tool—from basic operation to advanced techniques that will elevate your culinary creations.
How Does the Elechomes Dehydrator Actually Work?
Before diving into specific applications, let’s understand the science behind this marvelous machine. The Elechomes dehydrator operates on a beautifully simple principle: controlled heat circulation. Unlike conventional ovens that use high temperatures to cook food quickly, dehydrators employ gentle, consistent heat combined with steady airflow to gradually remove moisture from foods.
The Elechomes model features a powerful rear-mounted fan that propels warm air horizontally across each tray. This horizontal flow system ensures remarkably even drying—a significant advantage over vertical flow dehydrators where the bottom trays often receive more heat than the top ones. The result? Consistent drying throughout the entire unit without the need to rotate trays mid-process.
The precision temperature control system allows you to select the perfect setting for whatever you’re dehydrating. Delicate herbs might require just 95°F, while safely preserving meat jerky demands temperatures around 160°F. This versatility is what makes the Elechomes dehydrator suitable for such a wide range of foods and projects.
The Temperature Range: Precision When It Matters Most
Temperature control is where the Elechomes dehydrator truly shines. With an adjustable range from 95°F to 158°F (35°C to 70°C), you gain the flexibility to process everything from heat-sensitive herbs to dense, protein-rich meats.
This precision matters more than you might initially think. Dehydrating isn’t just about removing moisture—it’s about doing so at the optimal temperature for each food type to preserve nutrients, flavor, and color. Too hot, and you risk cooking rather than dehydrating, destroying valuable enzymes and vitamins. Too cool, and you create an environment where bacteria might thrive before the food properly dries.
I particularly appreciate the digital control panel that displays both the set temperature and remaining time. When you’re in the middle of a busy day, being able to glance at the machine and know exactly where you stand in the process is invaluable.
Assembling and Using Your Elechomes Dehydrator: Simpler Than You Think
When I first unpacked my Elechomes dehydrator, I was pleasantly surprised by how intuitive the setup process was. The package includes the main unit, several BPA-free trays (the exact number depends on your specific model), and a detailed instruction manual.
Assembly is straightforward:
- Place the base unit on a clean, level surface with adequate ventilation around it
- Stack the trays onto the base—they’re designed to fit together perfectly
- Place the lid on top
- Plug in the unit and use the digital controls to set your desired temperature and time
For first-time use, I recommend running the dehydrator empty for about 30 minutes. This eliminates any manufacturing residues and familiarizes you with how the unit operates. You’ll notice the gentle, consistent sound of the fan—surprisingly quiet compared to many kitchen appliances.
When loading your dehydrator, remember these key points:
- Cut items to uniform thickness for even drying
- Leave space between pieces to allow for proper air circulation
- Don’t overlap food pieces, as this can lead to uneven drying
- Start with clean, dry hands and equipment to maximize food safety
The Impressive Capacity: Room for Abundant Harvests
One feature that consistently impresses me about the Elechomes dehydrator is its generous capacity. Depending on your specific model, you’ll have anywhere from 5 to 12 stackable trays, providing substantial drying space.
To put this into perspective, a 6-tray model can accommodate approximately:
- 6-8 pounds of fresh fruit
- 4-5 pounds of meat for jerky
- 2-3 large bunches of herbs
- 8-10 medium-sized vegetables
What I particularly love is the expandability. Most Elechomes models allow you to purchase additional trays separately, enabling you to expand your capacity when dealing with seasonal abundance. This scalability has proven invaluable during harvest season when my garden produces more than I can immediately consume.
The square footage provided by these trays transforms into incredible efficiency. During apple season last fall, I was able to preserve three full bushels of apples in just four dehydrator loads—creating enough healthy snacks to last through winter and beyond.
Dehydrating Fruits: Nature’s Candy Made Easy
Let’s start with what might be the most popular application for any dehydrator: creating delicious dried fruit snacks. The Elechomes dehydrator excels at transforming seasonal fruits into shelf-stable treats that concentrate both flavor and nutrients.
Here’s my tried-and-true process for perfect dehydrated fruits:
- Selection: Choose ripe but firm fruits. Overripe specimens can become mushy during drying.
- Preparation: Wash thoroughly and pat dry. Remove any stems, pits, and blemishes.
- Cutting: Slice to uniform thickness—approximately ¼ inch works well for most fruits. Berries can be left whole or halved depending on size.
- Pretreatment: For fruits that tend to brown (apples, pears, bananas), dip slices in a solution of 1 tablespoon lemon juice to 1 cup of water. This preserves color and adds a subtle tang.
- Arrangement: Place pieces on dehydrator trays, ensuring they don’t overlap.
- Temperature Setting: Set your Elechomes dehydrator between 135°F and 145°F (57°C to 63°C) for most fruits.
- Timing: Depending on the fruit and your desired level of dryness, expect:
- Berries: 7-15 hours
- Apple/pear slices: 6-12 hours
- Banana chips: 6-10 hours
- Stone fruits (peaches, plums): 8-16 hours
- Citrus slices: 8-12 hours
- Testing: Properly dried fruit should be pliable but not sticky. When you tear a piece, you shouldn’t see any moisture beads along the tear.
I’ve found that slightly underripe bananas make exceptional chips when sliced thinly and dehydrated until crisp. A light brushing with lemon juice prevents browning, while a tiny sprinkle of cinnamon creates a treat that disappears within days in my household.
Creating Perfect Jerky: The Dehydrator’s Protein Powerhouse
If there’s one project that showcases the true value of the Elechomes dehydrator, it’s homemade jerky. Commercial versions often contain preservatives and excessive sodium, but your homemade version can be customized exactly to your taste preferences.
The question I’m most frequently asked is: “How long does it take to dehydrate jerky in an Elechomes dehydrator?” The answer depends on several factors including the thickness of your meat slices, your marinade, and your desired final texture. Generally speaking, jerky requires between 4-12 hours of drying time.
Here’s my foolproof method:
- Meat Selection: Choose lean cuts like eye of round, top round, or sirloin tip. The leaner the meat, the better it will dehydrate and the longer it will store.
- Preparation: Trim all visible fat (fat can go rancid during storage). Partially freeze the meat for about 2 hours—this makes it much easier to slice thinly and uniformly.
- Slicing: Cut with the grain for chewy jerky or against the grain for more tender results. Aim for ⅛ to ¼ inch thickness.
- Marinade: Combine your favorite seasonings with salt, a touch of sugar, and an acidic component like vinegar or citrus juice. Allow meat to marinate for 8-24 hours in the refrigerator.
- Preparation for Drying: Remove meat from marinade and pat dry with paper towels. This crucial step removes excess moisture and helps the jerky dry more efficiently.
- Temperature Setting: Set your Elechomes dehydrator to 160°F (71°C) for the first two hours to safely eliminate any potential bacteria, then reduce to 145°F (63°C) to complete the drying process.
- Drying Time: Most jerky requires 4-6 hours after the initial 2-hour safety period. The final product should bend and crack but not break completely.
- Testing: Properly dried jerky should bend and crack but not break completely. It shouldn’t contain any visible moisture when squeezed.
My personal favorite jerky recipe involves a marinade of soy sauce, Worcestershire, garlic powder, black pepper, and a touch of maple syrup. After dehydrating, the result is protein-rich snacks that support my active lifestyle without preservatives or excessive sodium.
Herb Dehydration: Preserving Nature’s Flavors
One of the most satisfying uses for my Elechomes dehydrator is preserving fresh herbs from my garden. There’s something magical about capturing the intense aromatics of summer herbs to enjoy throughout the winter months.
The Elechomes dehydrator is particularly effective for herb drying because of its precisely controlled low-temperature settings. Most herbs contain volatile oils that can be damaged by excessive heat, so the ability to dry at temperatures as low as 95°F (35°C) preserves both flavor and medicinal properties.
For perfect dried herbs:
- Harvesting: Cut herbs in the morning after dew has evaporated but before the hot sun draws out essential oils. Choose stems before flowering for the most concentrated flavor.
- Preparation: Gently wash if necessary and thoroughly pat dry. Remove any damaged leaves.
- Arrangement: Small-leaved herbs like thyme or oregano can be dried on the stem. For larger leaves like basil or sage, remove from stems and place in a single layer on dehydrator trays.
- Temperature Setting: Set your Elechomes dehydrator between 95°F and 115°F (35°C to 46°C).
- Timing: Most herbs dry completely within 1-4 hours. They should crumble easily when crushed.
- Storage: Store whole dried leaves in airtight containers away from light and heat. Crush only when ready to use to maximize flavor retention.
I’ve found that herb blends made from my dehydrated garden harvest make thoughtful, personalized gifts. My Italian seasoning blend combining homegrown oregano, basil, thyme, and rosemary has become a requested holiday gift among friends and family.
Vegetable Chips: Healthy Snacking Revolutionized
If you’ve ever paid premium prices for those small bags of vegetable chips at health food stores, you’ll be delighted to know your Elechomes dehydrator can produce better versions at a fraction of the cost.
Creating crispy, flavorful vegetable chips is simple:
- Selection: Choose fresh, firm vegetables. Beetroot, sweet potatoes, carrots, zucchini, and kale all make excellent chips.
- Preparation: Wash thoroughly and peel if desired. Slice root vegetables very thinly (1/16 to ⅛ inch) using a mandoline for consistency.
- Treatment: Lightly toss slices with a minimal amount of olive oil and your preferred seasonings. For kale chips, massage a tiny bit of oil directly onto the leaves.
- Arrangement: Place in a single layer on dehydrator trays, ensuring pieces don’t overlap.
- Temperature Setting: Set your Elechomes dehydrator between 125°F and 135°F (52°C to 57°C).
- Timing: Most vegetable chips require 6-12 hours. They’re done when completely crisp with no remaining moisture.
My personal discovery has been beetroot chips with a light sprinkle of sea salt and rosemary—their vibrant color and earthy sweetness make them as beautiful as they are delicious. Sweet potato chips with a touch of cinnamon and a hint of cayenne create a sweet-heat combination that’s utterly addictive.
The Benefits of Using an Elechomes Dehydrator: Beyond Food Preservation
While the obvious benefit of dehydrating is extending the shelf life of foods, the advantages of the Elechomes dehydrator extend far beyond simple preservation:
- Nutritional Density: Dehydrating concentrates nutrients while removing only water. A cup of dried blueberries contains significantly more antioxidants than a cup of fresh ones.
- Reduced Food Waste: Those slightly overripe bananas or the last few apples from your orchard trip no longer need to go to waste. Dehydration gives produce a second life.
- Financial Savings: Buying produce in season when prices are lowest and preserving through dehydration creates substantial cost savings compared to purchasing out-of-season fruits or pre-made dried snacks.
- Space-Efficient Storage: Dehydrated foods typically reduce to 1/4 to 1/3 of their original volume, making storage much more efficient than freezing or canning.
- Additive-Free Foods: Commercial dried foods often contain sulfites, excess sugar, and preservatives. Your homemade versions can be completely natural.
- Weight Reduction for Travel: Backpackers and campers particularly appreciate dehydrated foods for their lightweight, compact nature and high energy content.
- Energy Efficiency: The Elechomes dehydrator uses significantly less electricity than running an oven for similar purposes, making it both environmentally and economically sensible.
I’ve calculated that my dehydrator paid for itself within the first year just in terms of reduced food waste and the savings from not purchasing commercial dried fruit and jerky.
Cleaning and Maintenance: Keeping Your Elechomes Dehydrator in Top Condition
Proper cleaning is essential for both food safety and extending the life of your dehydrator. Fortunately, Elechomes has designed their units with ease of maintenance in mind.
For routine cleaning after each use:
- Unplug the unit and allow it to cool completely.
- Wash trays and other removable parts in warm, soapy water. Most Elechomes models feature dishwasher-safe trays (top rack only), though I prefer hand washing to maximize longevity.
- Wipe down the exterior and interior base with a damp cloth. Never immerse the base unit in water or allow liquid to enter the fan or heating elements.
- For stubborn residues on trays (particularly common with sticky fruits or marinades), soak in warm water for 30 minutes before cleaning.
- Ensure all components are completely dry before reassembling and storing.
For deeper cleaning every few months:
- Check the fan area for any dust accumulation and gently clean with a soft brush if necessary.
- Inspect the heating element for any food particles that might have fallen through and remove them carefully.
- Clean any control panels with a slightly damp microfiber cloth—never use abrasive cleaners on electronic components.
I’ve found that placing a sheet of parchment paper on trays when dehydrating particularly sticky items makes cleanup significantly easier. Just be sure to cut the paper slightly smaller than the tray to allow for proper air circulation.
Comparing Elechomes to Other Dehydrator Brands
Having experimented with several dehydrator brands before settling on my Elechomes model, I can offer some perspective on how it compares to alternatives on the market.
The Elechomes dehydrator distinguishes itself in several important ways:
- Temperature Precision: The digital thermostat offers more accurate temperature control than many competitors in the same price range, which often use simple dial controls without specific temperature indicators.
- Airflow Design: The horizontal airflow system ensures more even drying compared to vertical flow models where bottom trays receive more heat.
- Noise Level: The Elechomes operates at approximately 48dB, noticeably quieter than many competitors that can reach 60dB or higher.
- BPA-Free Materials: All food-contact surfaces are made from BPA-free materials, an important consideration for health-conscious users.
- Timer Function: The digital timer that automatically shuts off the unit provides convenience that many comparable models lack.
- Value Proposition: While not the least expensive option available, the Elechomes offers professional-level features at a mid-range price point, representing excellent value.
When compared to premium brands costing twice as much, the Elechomes holds its own remarkably well. The main advantages of ultra-premium models tend to be slightly more precise temperature control and perhaps more robust construction, but for most home users, these differences rarely justify the substantial price increase.
Is the Elechomes Dehydrator Good for Beginners?
If you’re new to dehydrating, you might wonder if the Elechomes is an appropriate starting point. Based on my experience introducing friends to dehydrating, I can confidently say it’s an excellent choice for beginners.
The features that make it particularly beginner-friendly include:
- Intuitive Controls: The straightforward digital interface eliminates guesswork.
- Consistent Results: The even heating and airflow are forgiving of minor mistakes in food preparation.
- Clear Instructions: The included manual provides comprehensive guidance for first-time users.
- Visibility: The transparent door allows you to monitor progress without interrupting the drying process.
- Recipe Inclusion: Most models come with a basic recipe booklet to help you get started.
For novices, I recommend beginning with simple projects like apple chips or banana slices. These fruits are forgiving, dry relatively quickly, and provide almost immediate gratification. Once you’ve mastered these basics, you can gradually work up to more complex projects like jerky or creating complete dehydrated meals.
Creative Recipes to Try With Your Elechomes Dehydrator
Beyond the basics, your Elechomes dehydrator opens up a world of culinary creativity. Here are some of my favorite unique recipes that showcase the versatility of this appliance:
Fruit Leather Rolls
Transform fruit purees into portable, preservative-free snacks:
- Blend 4 cups of fresh or frozen fruit with 2 tablespoons honey or maple syrup
- Add 1 tablespoon lemon juice to brighten flavor and help preserve color
- Pour a thin, even layer onto dehydrator trays lined with parchment paper
- Dehydrate at 135°F for 6-8 hours until no longer sticky to touch
- Cut into strips and roll up for grab-and-go snacking
Yogurt Drops
A healthy alternative to candy for children and adults alike:
- Mix 2 cups of plain Greek yogurt with 2 tablespoons honey and 1 teaspoon vanilla
- Transfer to a piping bag or zip-top bag with corner snipped
- Pipe small dots onto dehydrator trays lined with parchment
- Dehydrate at 125°F for 8-10 hours until completely dry
- Store in airtight containers for a protein-rich snack
Dried Mushroom Powder
Create an umami flavor bomb for soups, stews, and sauces:
- Clean and slice mushrooms (portobello and shiitake work particularly well)
- Dehydrate at 125°F until completely brittle (8-10 hours)
- Pulse in a coffee grinder or food processor until powdered
- Store in airtight jars and use a teaspoon at a time to add depth to savory dishes
Crispy Chickpea Snacks
A protein-rich alternative to chips or nuts:
- Drain and rinse canned chickpeas
- Toss with 1 tablespoon olive oil and your choice of seasonings
- Spread in a single layer on dehydrator trays
- Dehydrate at 145°F for 8-10 hours until completely crisp
- Allow to cool before storing in airtight containers
Storing Your Dehydrated Creations for Maximum Shelf Life
All your hard work with the Elechomes dehydrator deserves proper storage techniques to ensure maximum shelf life and quality. The key factors affecting storage life are moisture, light, air, and temperature.
For optimal long-term storage:
- Cool Completely: Allow dehydrated foods to cool entirely before packaging. Warm food can create condensation inside containers, introducing unwanted moisture.
- Conditioning: For fruits and vegetables, condition before final storage by placing loosely in a glass jar for 5-7 days, shaking daily to redistribute any remaining moisture. If condensation appears, return to the dehydrator for additional drying.
- Container Selection: Glass jars with tight-fitting lids provide the best protection. Mason jars with proper seals are ideal. For longer-term storage, vacuum-sealed bags significantly extend shelf life.
- Oxygen Absorbers: For items you plan to store more than a few months, consider adding oxygen absorber packets to containers.
- Light Protection: Store containers in a dark location or use amber-colored glass jars to protect against light degradation of nutrients.
- Temperature Considerations: Store dehydrated foods in the coolest location available. Each 10°F increase in storage temperature can reduce shelf life by half.
- Labeling: Always label containers with contents and date of dehydration.
With proper storage, most dehydrated fruits and vegetables will maintain good quality for 6-12 months. Dried herbs typically retain flavor for 1-2 years, while properly prepared jerky stored in refrigeration can last 1-2 months.
Energy Efficiency: The Eco-Friendly Aspect of the Elechomes Dehydrator
In our increasingly environmentally conscious world, the energy efficiency of appliances matters. The Elechomes dehydrator performs admirably in this regard, using approximately 200-500 watts depending on the specific model and current temperature setting.
To put this in perspective, dehydrating uses significantly less energy than:
- Conventional oven drying (which uses 2000-5000 watts)
- Freezing (which requires ongoing energy for maintenance)
- Many other preservation methods
To maximize energy efficiency:
- Fill all trays when operating
- Maintain your dehydrator properly for optimal performance
- Cut foods into uniform pieces for faster, more even drying
- Use the timer function to avoid running the unit longer than necessary
I’ve calculated that dehydrating a full load of apples in my Elechomes unit costs approximately $0.30-0.50 in electricity—far less than the equivalent commercially dried product would cost.
Warranty and Customer Support: Peace of Mind with Your Purchase
Elechomes stands behind their products with a standard 12-month warranty on most dehydrator models. Some retailers offer extended warranty options if desired.
The warranty typically covers:
- Manufacturing defects
- Premature failure of heating elements
- Motor or fan issues
- Control panel malfunctions
It generally doesn’t cover:
- Damage from improper use
- Normal wear and tear
- Cosmetic issues that don’t affect functionality
In my experience, Elechomes customer service is responsive and helpful. When I had a question about an unusual noise (which turned out to be nothing serious), their team provided assistance within 24 hours.
Keep your receipt and original packaging if possible, as these may be required for warranty service. Registering your product on the Elechomes website can also streamline any future support needs.
Troubleshooting Common Issues with Your Elechomes Dehydrator
Even the best appliances occasionally encounter issues. Here are solutions to the most common problems you might experience:
Uneven Drying
Possible causes and solutions:
- Food pieces are different sizes: Cut more uniformly in future batches
- Overcrowded trays: Leave more space between pieces
- Trays need rotation: Some models benefit from occasional tray rotation during very long drying sessions
Dehydrator Won’t Turn On
Possible causes and solutions:
- Not properly plugged in: Check electrical connection
- Timer not set: Ensure timer is activated if required by your model
- Door not completely closed: Some models have safety switches requiring proper door closure
Food Sticking to Trays
Possible causes and solutions:
- High sugar content foods naturally stick: Use parchment paper cut to size
- Trays need light oil spray before use with certain foods
- Items not dried enough: Complete drying cycle until proper dryness achieved
Unusual Noise
Possible causes and solutions:
- Foreign object near fan: Unplug and check for obstructions
- Dehydrator not on level surface: Reposition on flat, stable surface
- Trays not properly seated: Ensure all components are correctly assembled
Food Taking Too Long to Dry
Possible causes and solutions:
- Humidity in environment too high: Use in less humid area if possible
- Temperature set too low for food type: Adjust to appropriate temperature
- Food cut too thick: Slice more thinly in future batches
- Overcrowded trays limiting airflow: Reduce quantity and ensure proper spacing
Conclusion: The Elechomes Dehydrator—An Investment in Healthy Living
As we reach the end of this comprehensive exploration, it’s clear that the Elechomes dehydrator represents far more than just another kitchen appliance—it’s a versatile tool that empowers you to take control of your food preservation, nutrition, and culinary creativity.
From creating nutrient-dense snacks to preserving seasonal abundance, reducing food waste to crafting unique culinary ingredients, this appliance earns its counter space many times over. The combination of precise temperature control, even airflow, generous capacity, and user-friendly design makes the Elechomes dehydrator suitable for both novices and experienced food preservation enthusiasts.
As our collective consciousness shifts toward more sustainable, wholesome approaches to food, tools like the Elechomes dehydrator become increasingly relevant. They connect us to traditional preservation methods while incorporating modern technology to ensure safety, efficiency, and consistent results.
Whether you’re motivated by health considerations, environmental concerns, economic factors, or simply the joy of creating delicious foods from scratch, the Elechomes dehydrator offers a pathway to achieving those goals. My own journey with food dehydration has been one of continual discovery and satisfaction—I hope yours will be too.
What will you create first with your Elechomes dehydrator? The possibilities are as endless as they are delicious.